This article provides an overview of the features and functionality of your Admin Dashboard, the web-based tool for managing your domain names and related services.
Logging In
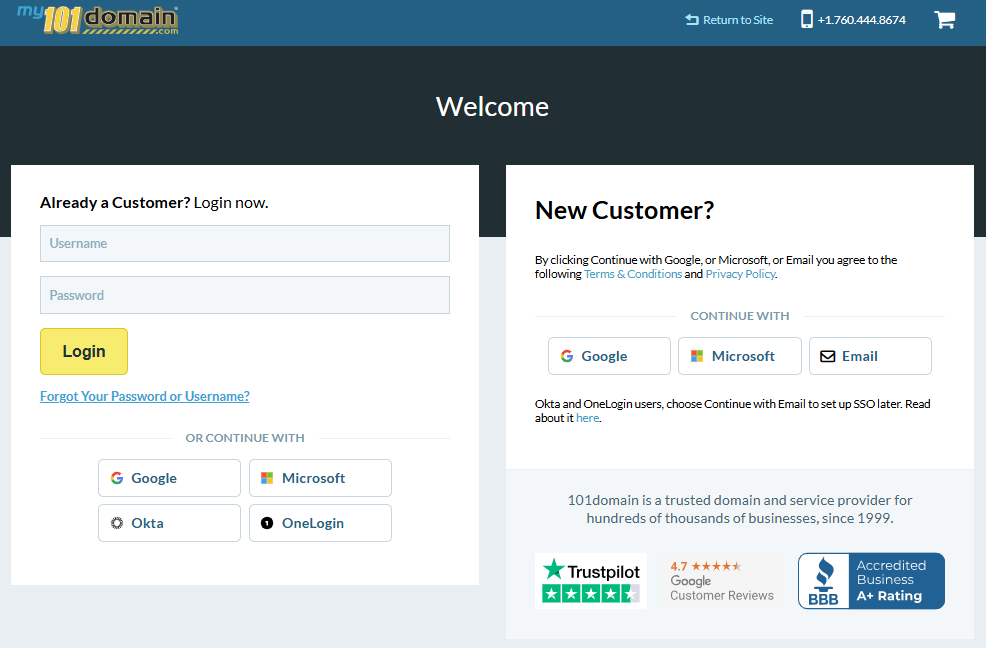
To login to your Admin Dashboard:
-
Navigate to https://my.101domain.com.
-
Enter your username and password.
-
Click Login.
If you have issues with your username and password, please contact your customer service team at support@101domain.com.
When logging in for the first time, you will be prompted to agree to our Legal & Service Agreements and set up security questions. These three questions are required for account recovery or to lock your domain services.

Site Search

Use the search bar at the top of the Dashboard to find domain names. Enter the domain name, and matching records will display.
Home Page
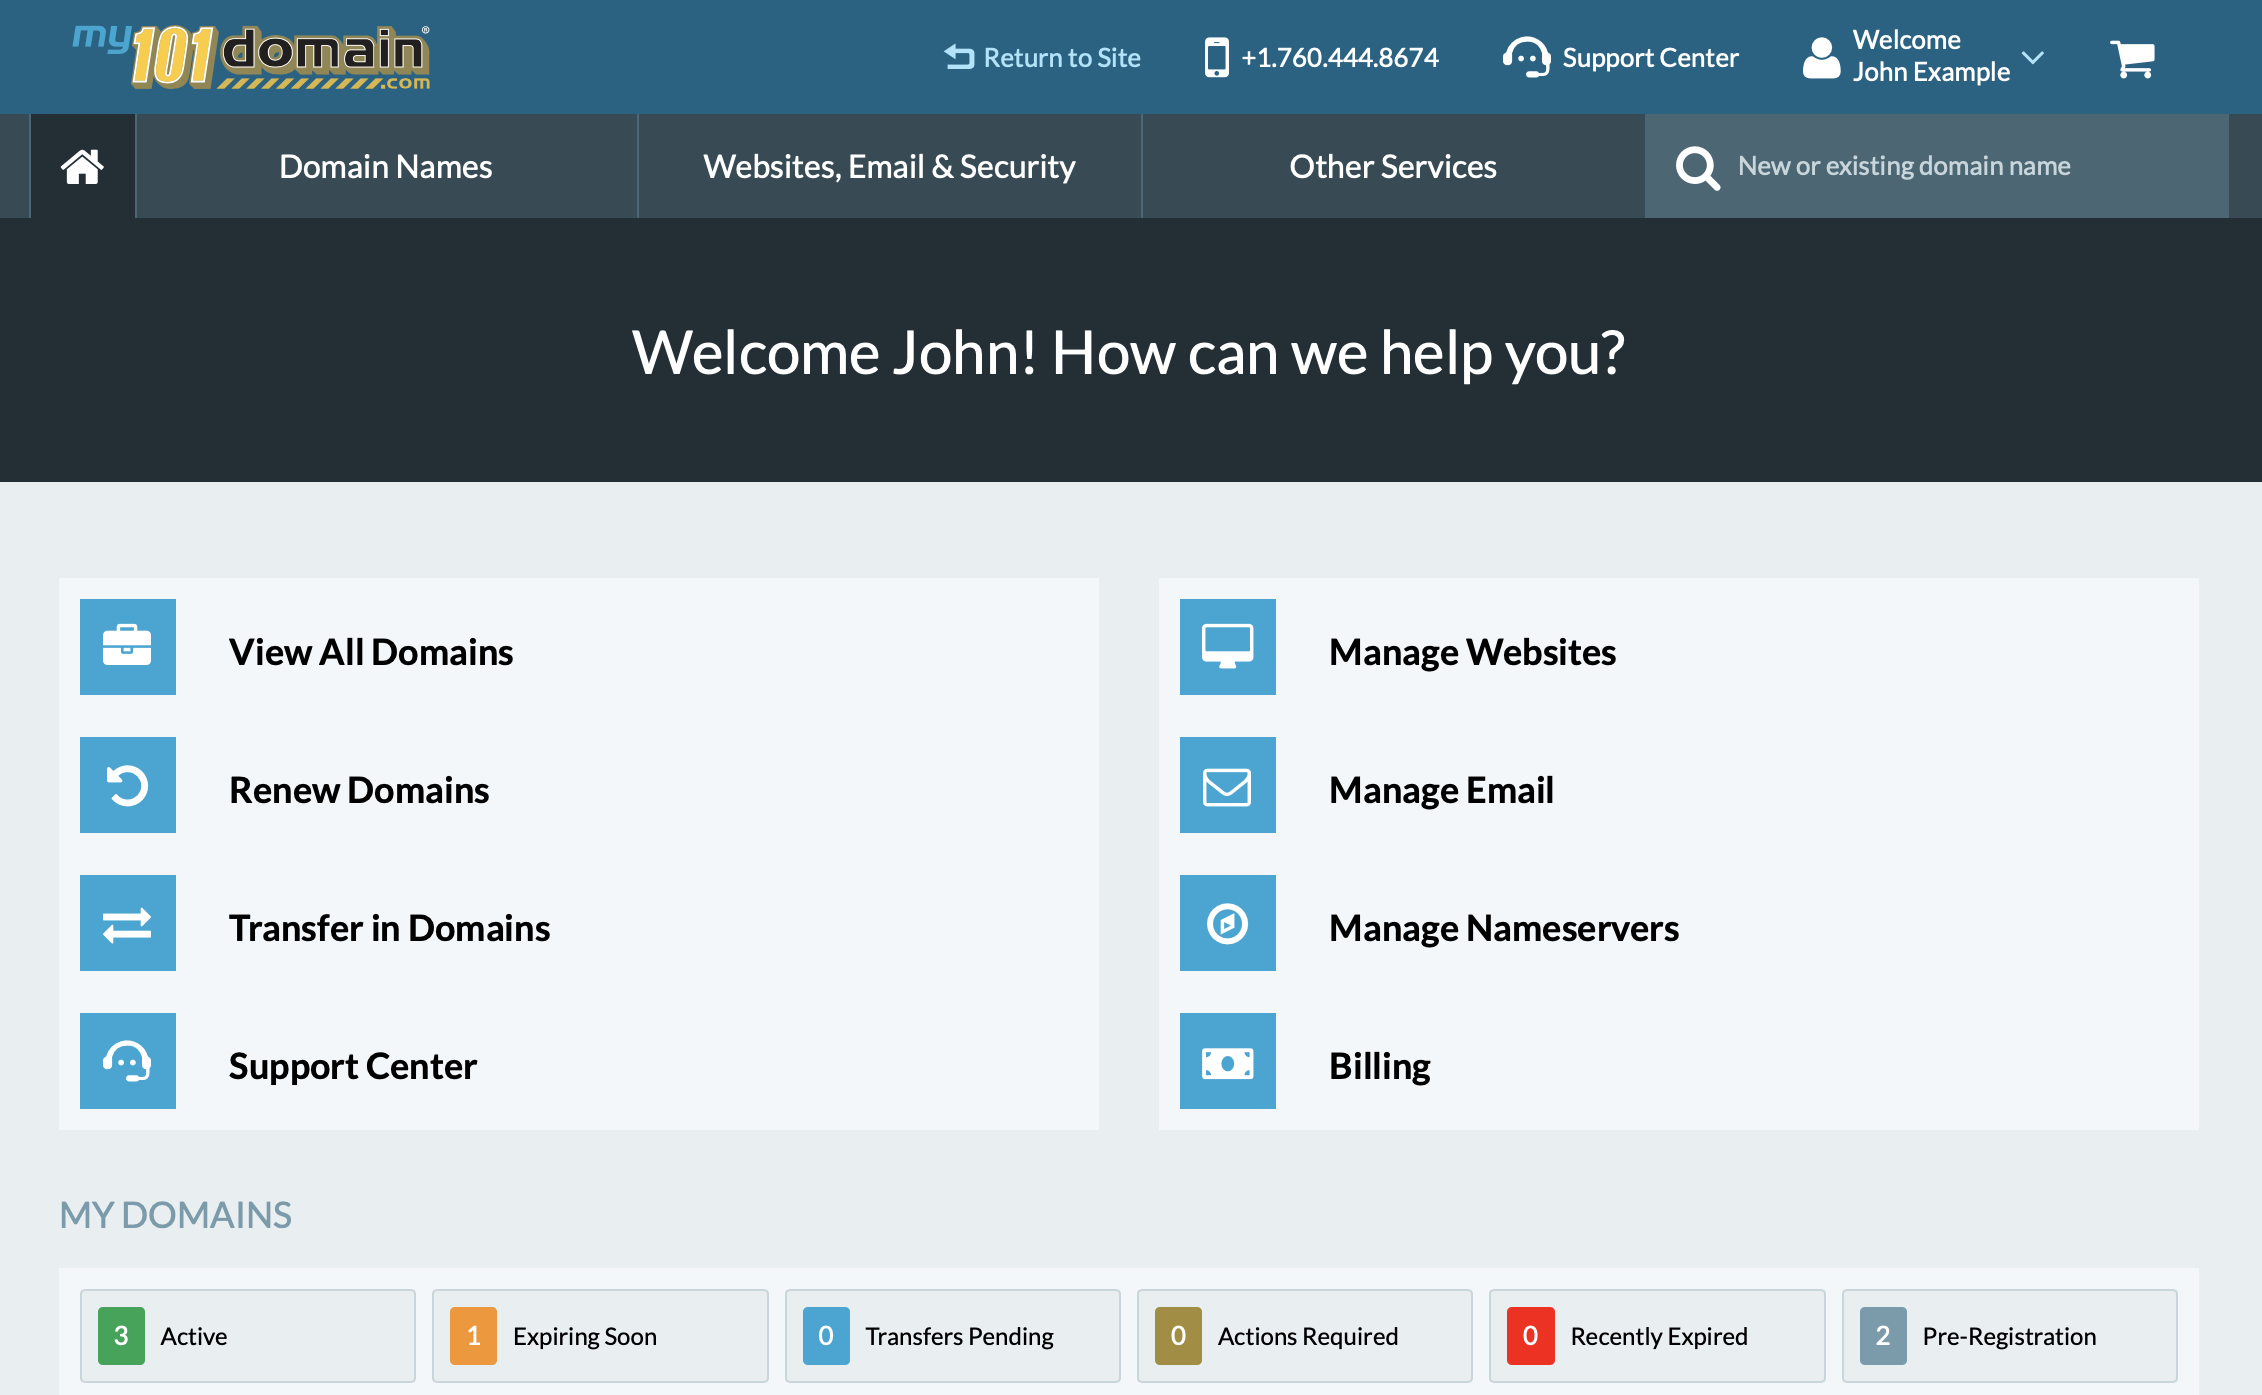
The Home Page provides quick access to tools for managing your domain portfolio. From here, you can:
-
View All Domains
-
Renew Domains
-
Transfer in Domains
-
Manage Websites
-
Manage Email
-
Contact our Support Center
-
Manage Nameservers
-
Manage your Billing
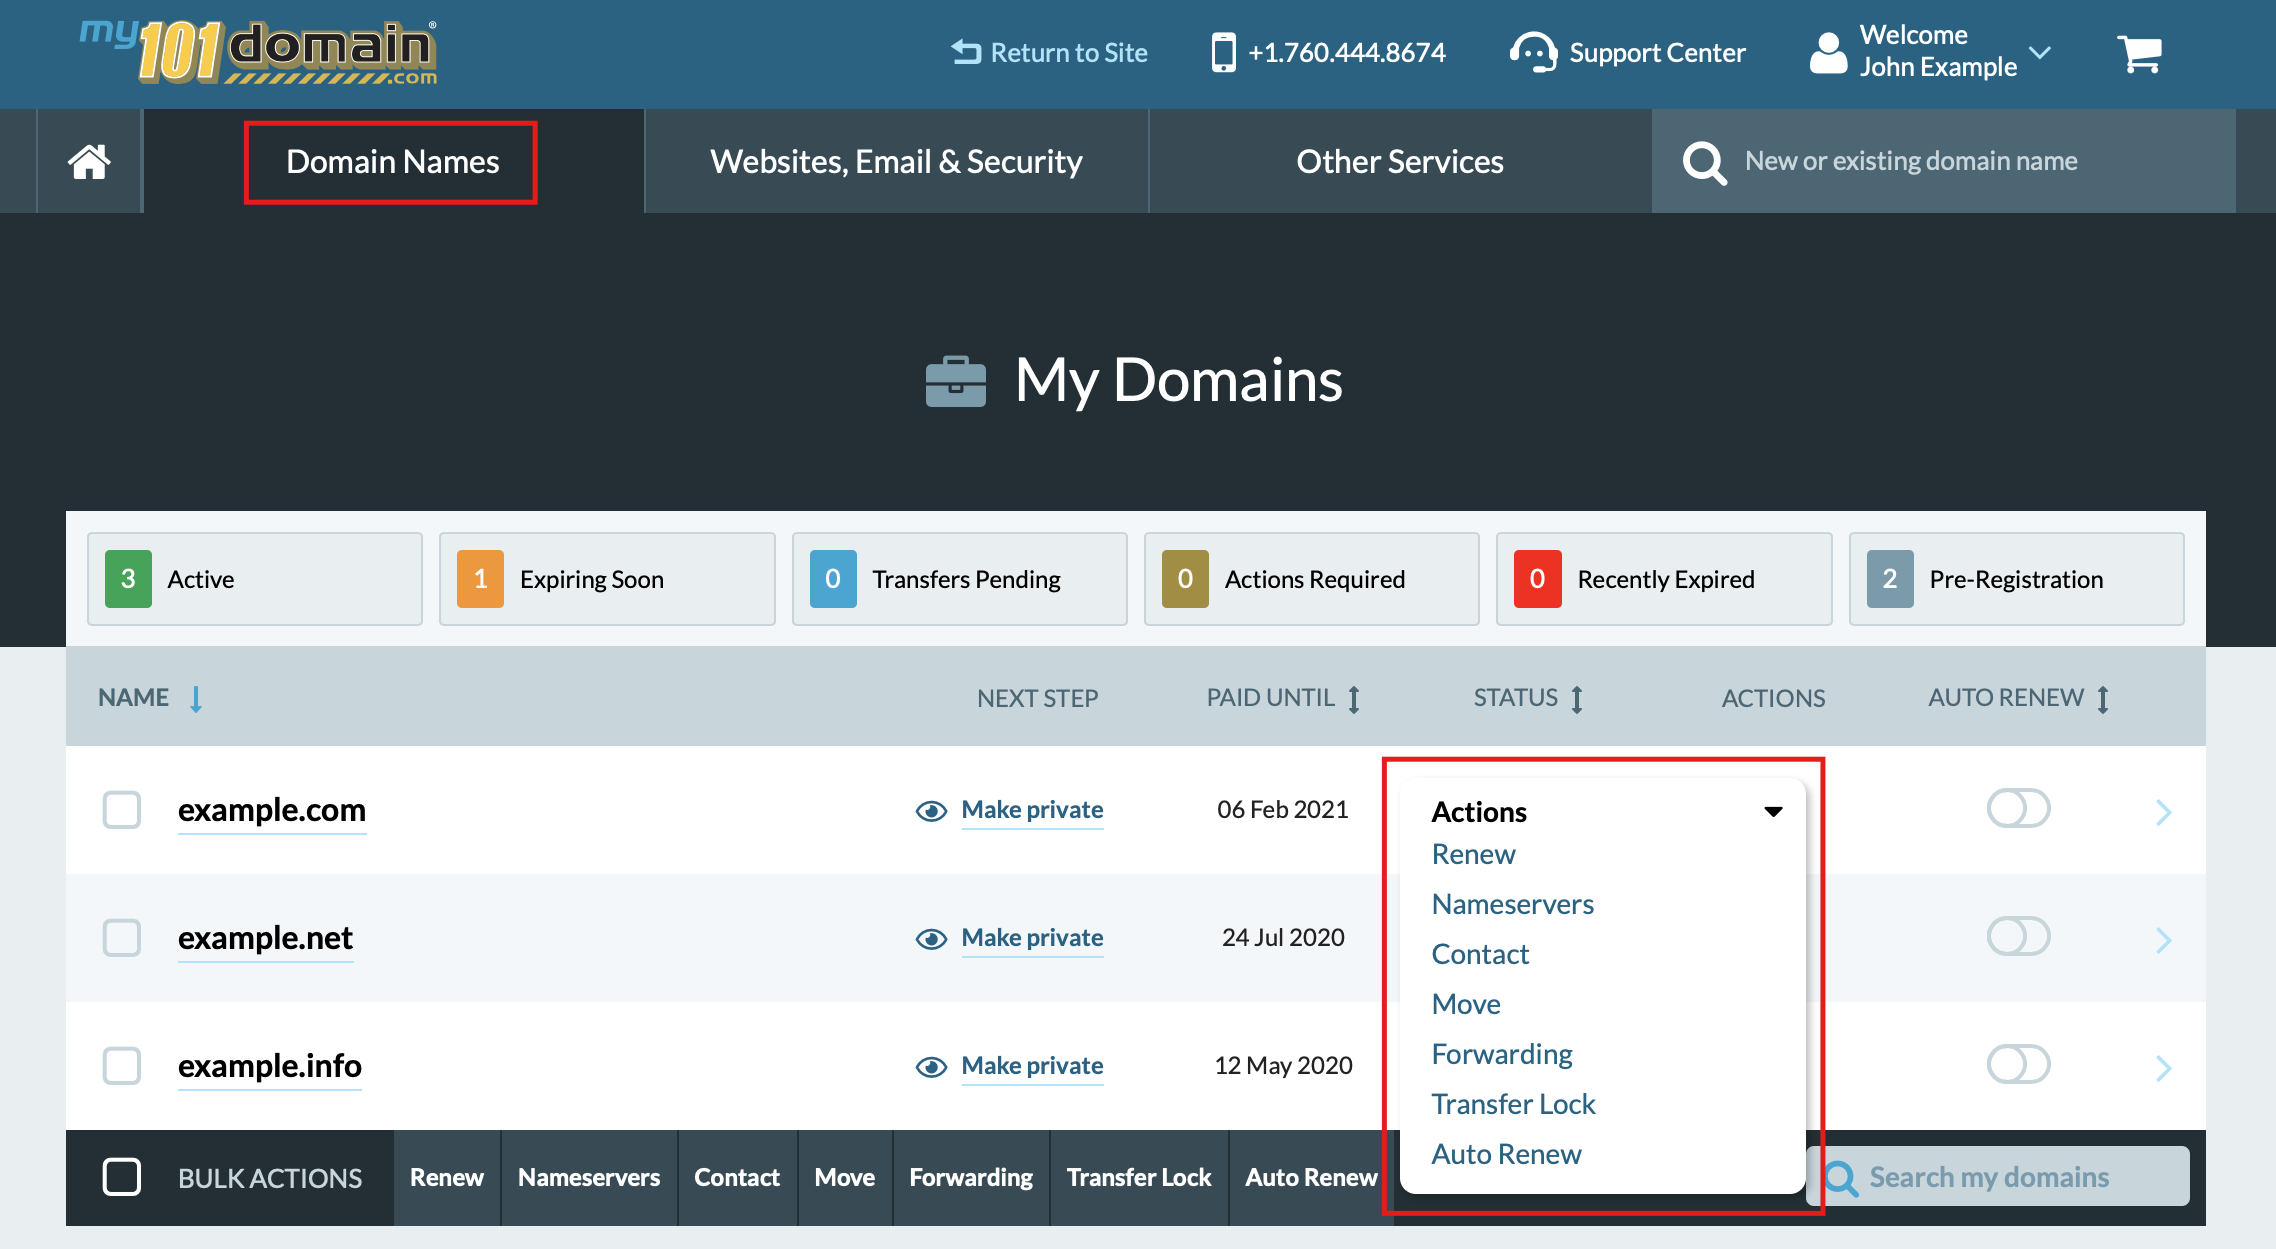
Domain Names
From within the Domain Names tab, you can do the following:
-
View All Domains
-
Renew Domains
-
Update Nameservers
-
Update Contact
-
Move domain to a folder
-
Configure Web Forwarding
-
Turn on/ off Transfer Lock
-
Set up Auto Renewal
Some of these options may not be available depending on user permissions.
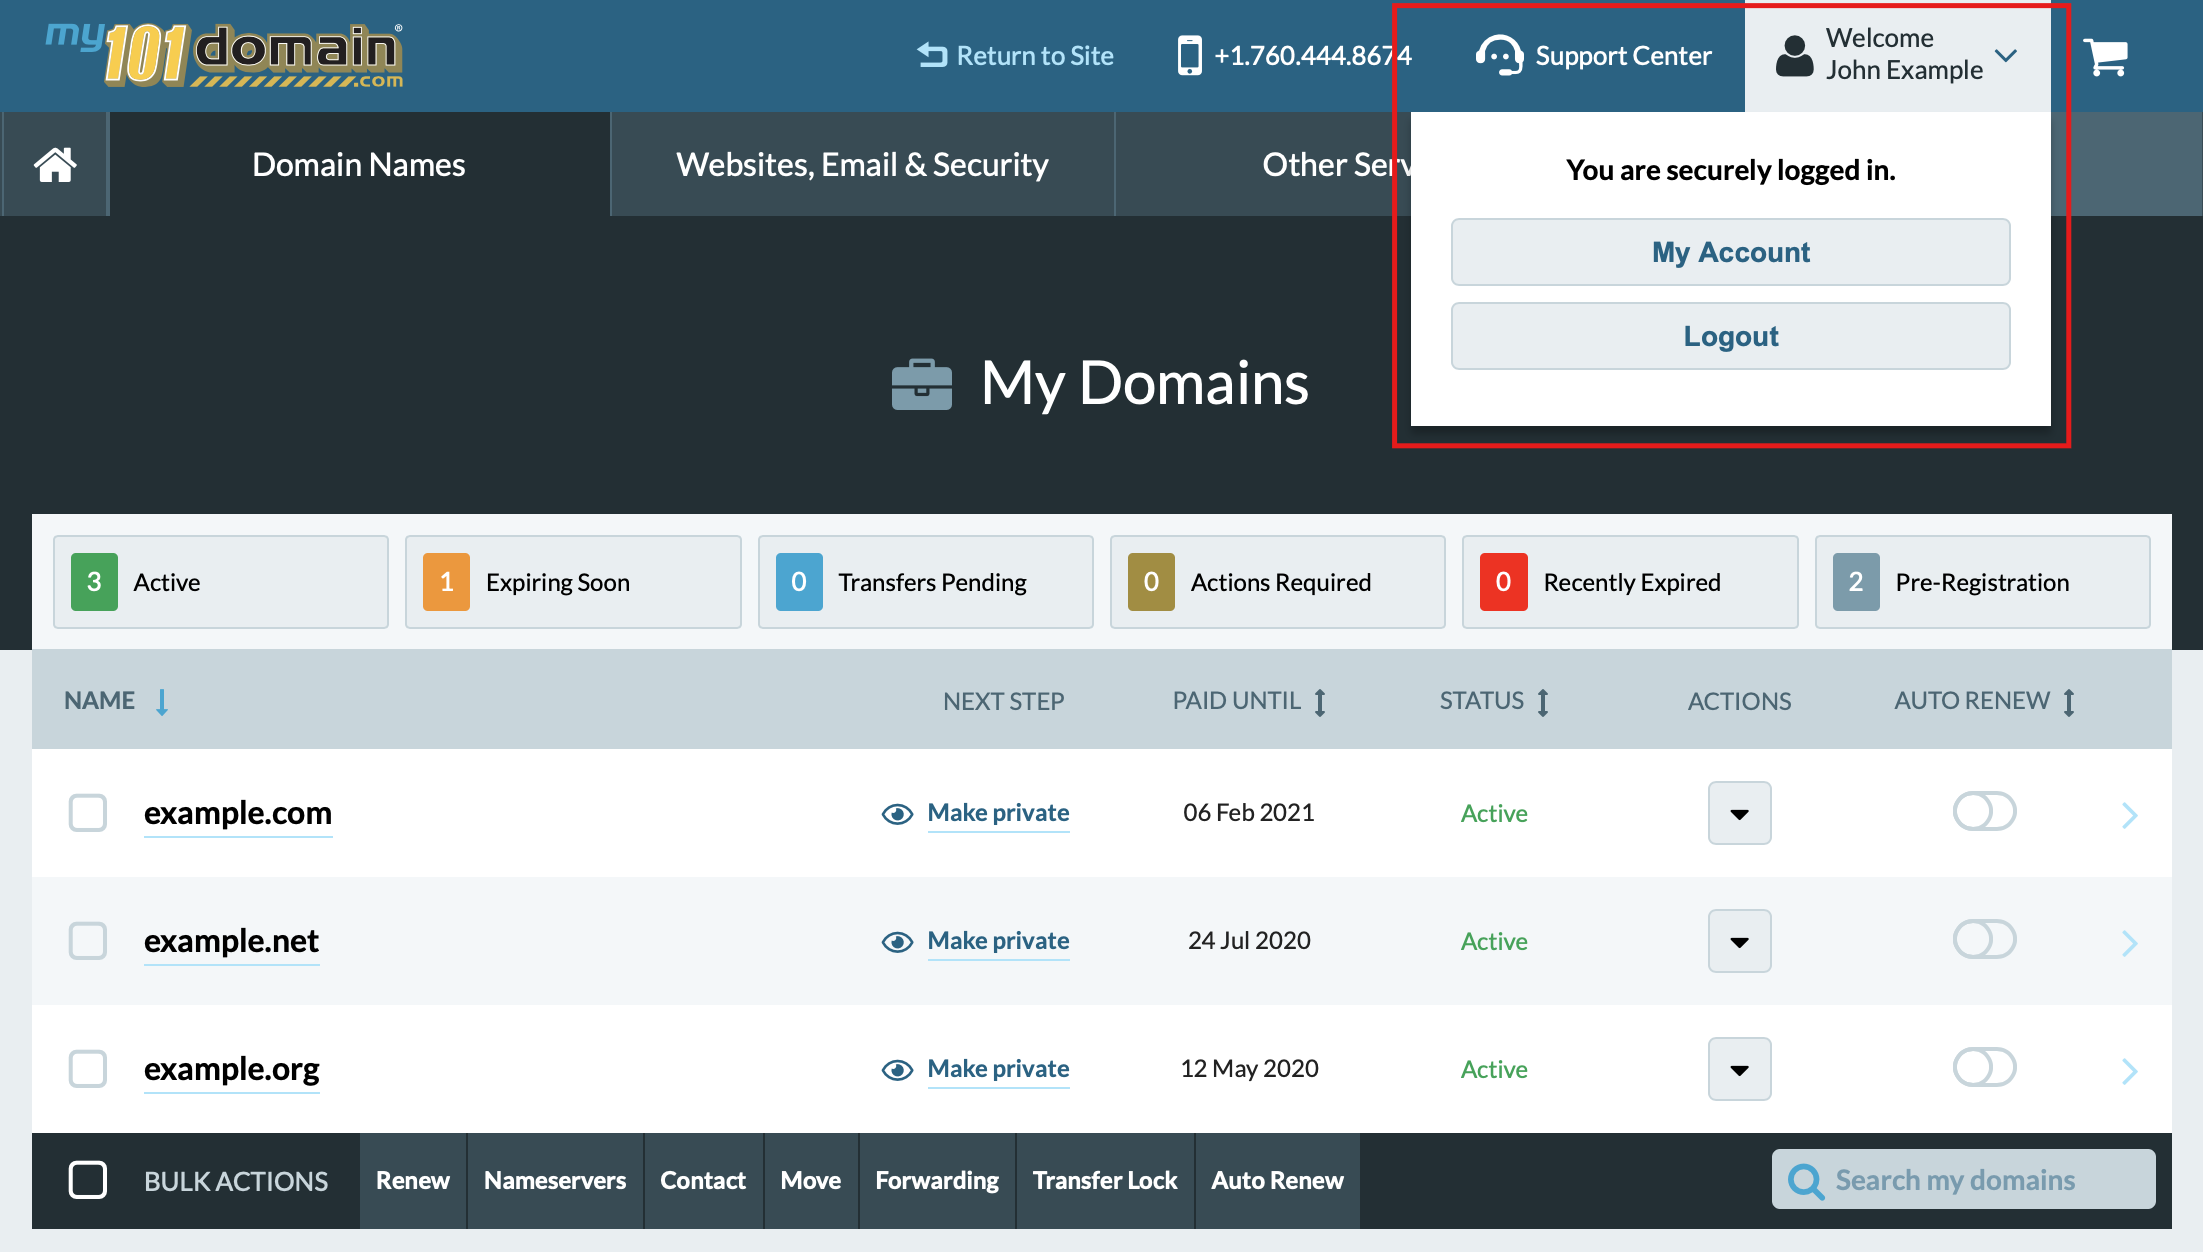
Account Management
To manage your account settings, please select My Account from the drop-down under your username.
Account Settings
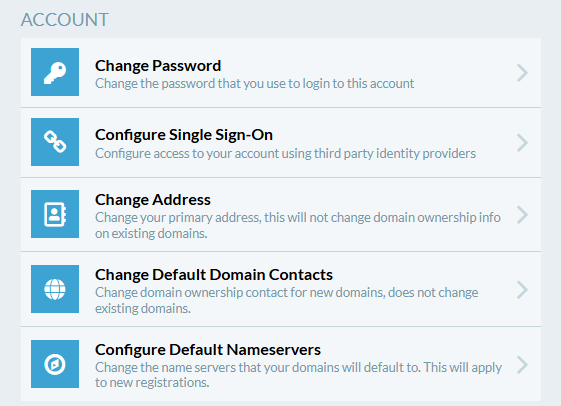
In Account Settings, you can:
Change Password
Update your password regularly to keep your account secure.
Configure Single Sign-On
Strengthen your login security by opting into our Single Sign-On (SSO) feature.
We currently offer SSO for:
-
Google Workspace
-
Microsoft Entra ID (formerly Azure AD)
-
Okta
-
OneLogin
Change Address
The changes you can make here include first and last name, alternative emails, mailing address, and phone numbers.
Changing your account address does not affect existing domain name Public Domain Ownership information.
If you wish to change the Public Domain Ownership or Contact information for your domain names you may do so by clicking on the Domains Names tab, selecting the domain, and changing the contact information.
Public Domain Contact and Ownership Information was previously referred to as WHOIS.
Change Default WHOIS
You can change default WHOIS contact for new domain names.
Changing default WHOIS does not change WHOIS contact for existing domain names.
Default Nameservers
Change the nameservers that your domain names will default to. This will apply to new registrations only.
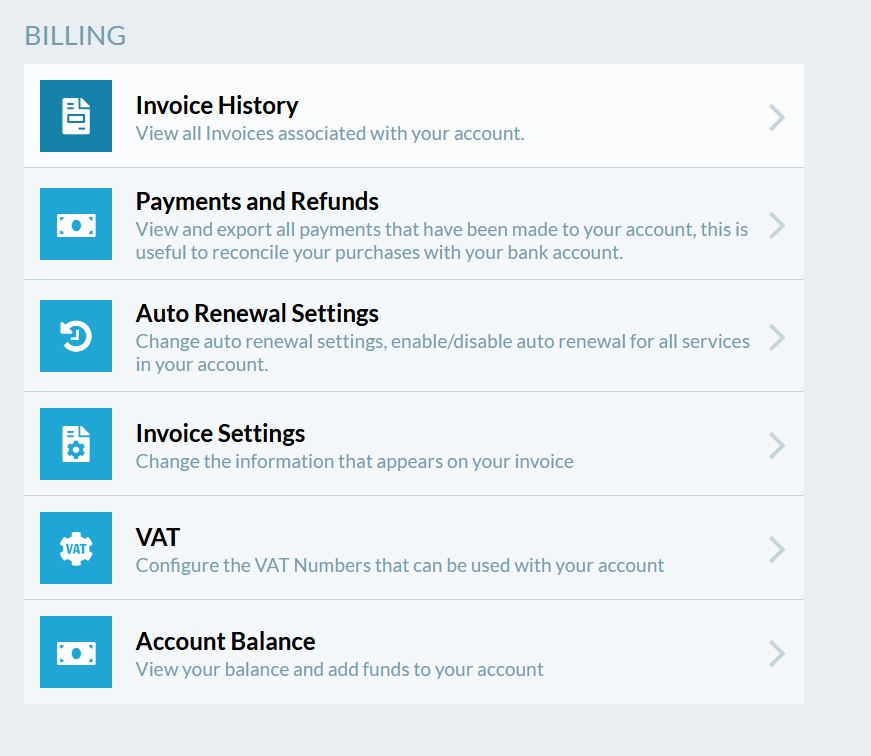
Billing Settings
In the Billing section, you can:
Invoice History
View all invoices associated with your account.
Payments and Refunds
View and export all payments that you have made in your account; this is useful when reconciling your purchases with your account balance.
Auto Renewal Settings
Change auto renewal settings, enable / visible auto renewal for all services in your account.
Invoice Settings
Change information that appears on your invoice (Your Business or Tax ID) as you want it to appear on your invoices.
VAT
Configure the VAT Number that can be used with your account. Account Balance View your account balance and add funds to your account.
The Funds can be added with:
-
Credit Card (will be subject to a 4% service charge).
-
Check.
-
PayPal (PayPal transaction will be subject to a 4% service charge which will be deducted from the deposit).
-
Wire transfer (the wire transfer fee of $30.00 USD is the responsibility of the sender).
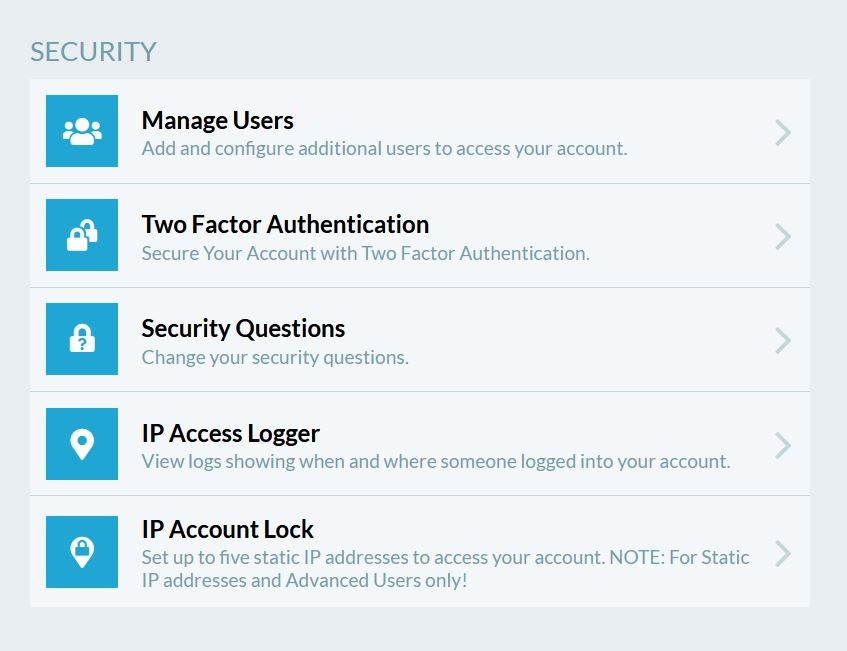
Security Settings
In the Security section, you can:
Manage Users
Add and manage additional users who can access your account. When set up, each user has their own username and password to log in to the account with privileges that are personalized for their specific role.
Only a primary account holder can create/ remove a new user. Once users are added, they will be emailed instructions on how to login to their Admin Dashboard. The primary account holder will need to share the new user account username and password with the new user, as this information is not emailed to them for security reasons.
Users can have different roles and permissions to manage changes, billing, and account settings. For details on the different user roles, visit our article User Roles.
Two Factor Authentication
2-Step Verification helps protect your account from being hacked.
Even if someone manages to obtain, crack, guess or steal your password, they can’t sign in without access to your additional verification. This verification code is provided by the authenticator mobile app.
If you have multiple contacts associated with the account, it is suggested that all users setup Two Factor Authentication. All contacts will be required to enter a unique code each time they want to log in to the account. Contacts who do not have it setup will be unable to log in without the unique authorization code.
The authentication code is a one-time use code that you must get from the authenticator app you download as part of the Two Factor Authentication setup.
Security Questions
Here you can change your security questions.
The answers to three security questions are required in the case that you lose your password or wish to lock your domain services.
IP Access Logger
View logs showing when and where someone logged into your account. This allows you to keep track of your account login activity for added security. Review and monitor your account logs for suspicious activity. If you notice an unfamiliar IP Address or abnormal activity, change your password immediately to protect yourself.
IP Account Lock
Set up to five static IP addresses with permission to access your account. This feature restricts your account so it can only be logged in from IP Addresses that you define.
Support Center
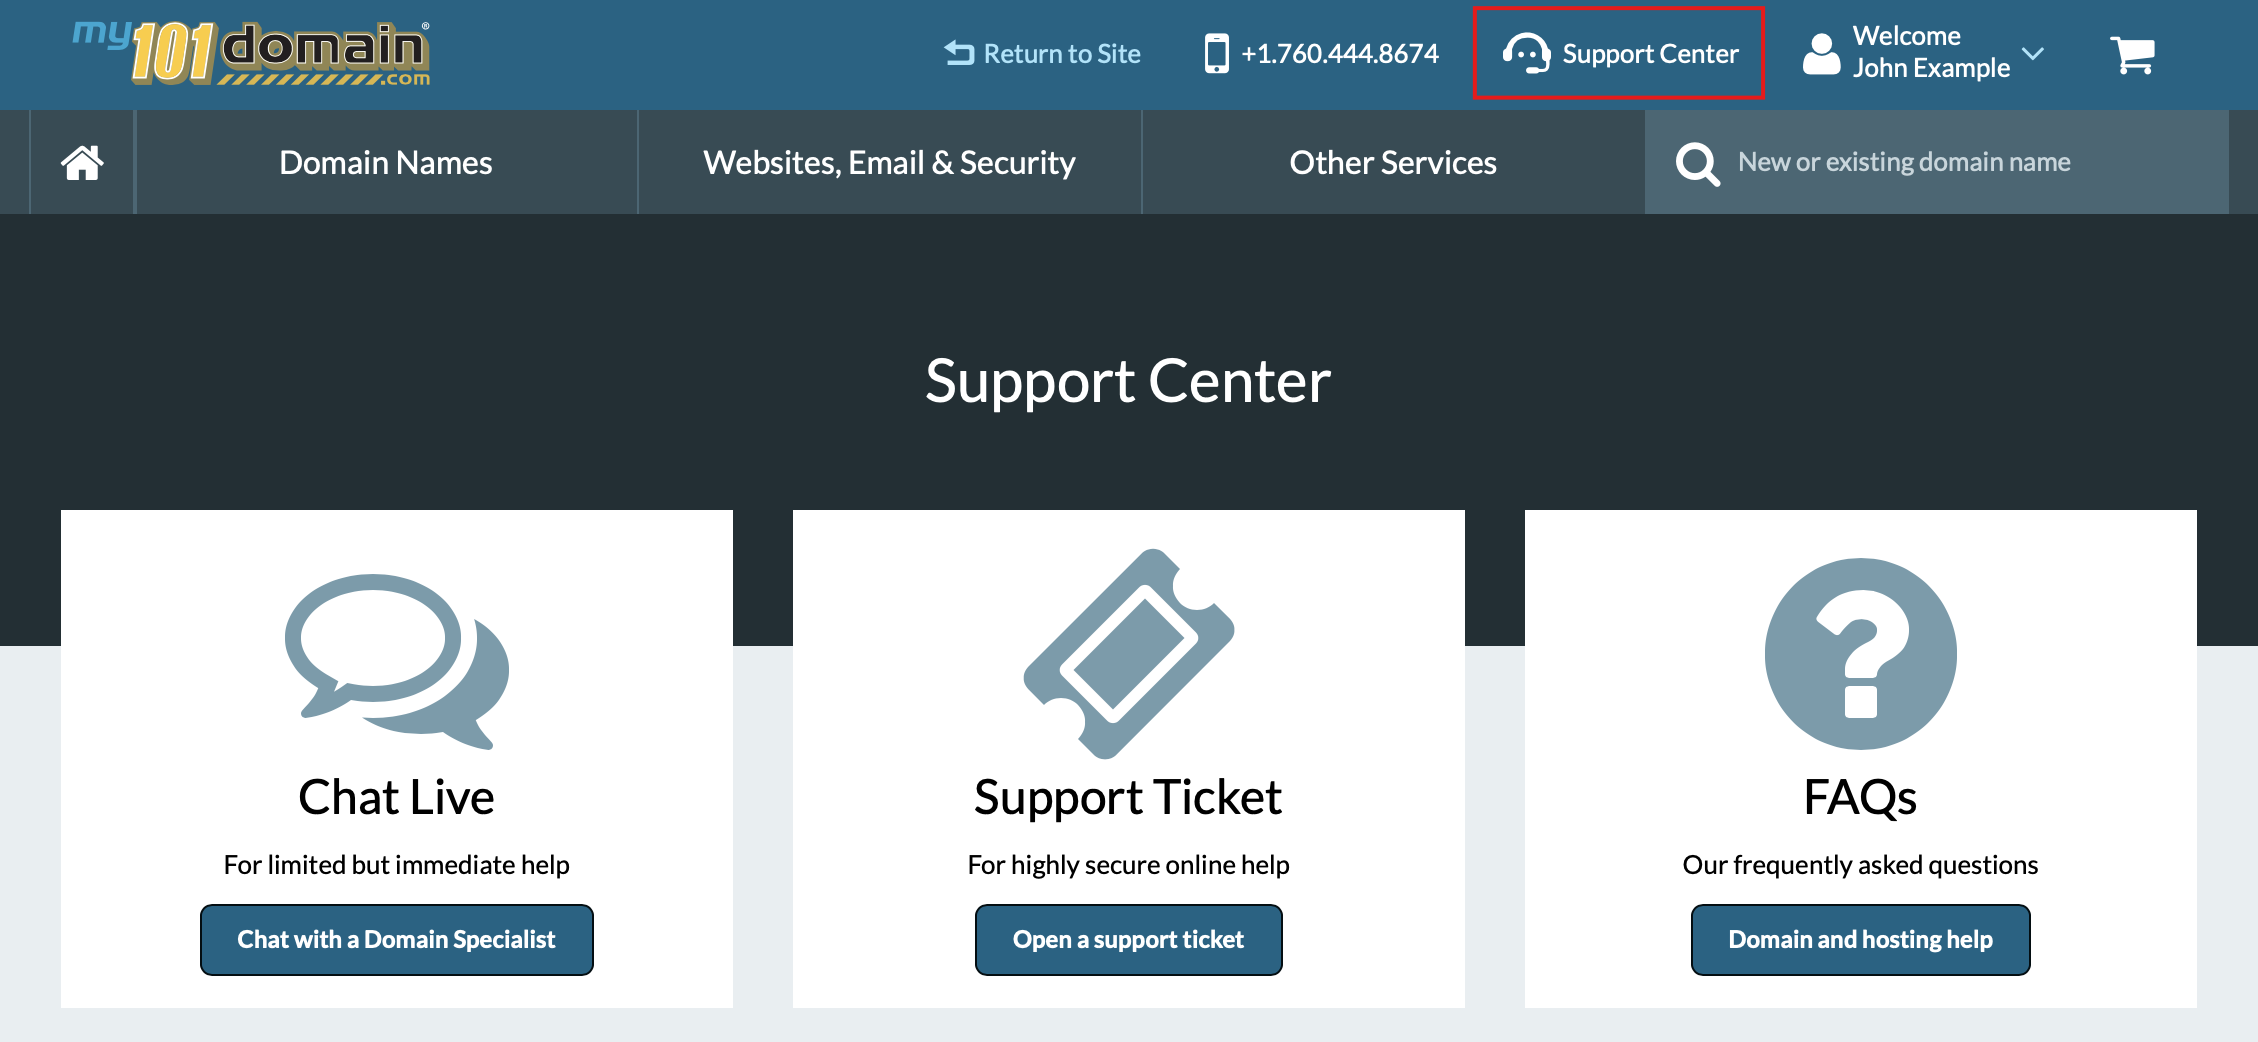
There are many different ways to get help at 101domain. Chat with our friendly support team, open a support ticket, or consult our knowledge base - available 24/7.
Support ticket
If you are experiencing difficulty, send a message to 101domain Support by opening a ticket in the Support Center.
Support tickets are answered in the order they are received.
Live Chat
Chat with a domain specialist for immediate help during open office hours.
Once the chat popup is displayed, select a department depending on your inquiry.
FAQs
Consult our Knowledge Base for a little self-study. Our resources are available 24/7.
Account Access
Resetting Your Password
If you have access to the email address associated with the account, you can reset the password with following steps:
-
Click on the Forgot your username or password? link at https://my.101domain.com/ in the Sign In area.
-
Enter the Username associated with your account. A reset password email will be sent to the email address associated with your account.
-
Follow the instructions in the email to reset your password.
Account Recovery
If you lose your login credentials or security questions; if the email address associated with your account or 2-Factor Authentication Code or device is unavailable; or other reasons your account has become inaccessible, please email us at support@101domain.com.
The required information needs to be sent to support@101domain.com for verification.