
This guide explains how to configure your DMARC policy settings within OnDMARC’s Dynamic DMARC feature before delegating the protocol. Following this process ensures your security posture is fully defined and ready to be served the moment the delegation goes live.
Overview of Dynamic DMARC
Redsift’s OnDMARC Dynamic Services replaces traditional, manual DNS text strings with "Smart Records." Instead of editing complex code in your DNS zone file, you manage your policy, including enforcement levels and reporting addresses, through a centralized interface. By delegating the _dmarc subdomain to OnDMARC, updates to your policy take effect in minutes rather than hours.
Step 1: Pre-Configure Your DMARC Policy
Before delegating the protocol in your DNS, it is recommended to "prime" the platform by defining your desired DMARC tags. This ensures that your policy is active the instant the delegation is recognized.
-
Log in to your OnDMARC dashboard and go to the DMARC > Dynamic Services.
-
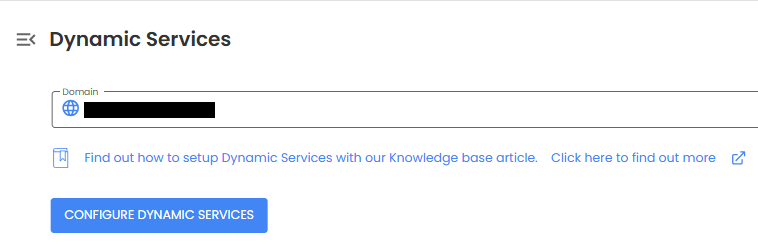
If it is not already enabled, select CONFIGURE DYNAMIC SERVICES to toggle the feature and enable it in the backend.
-
Select the DMARC tab.
-
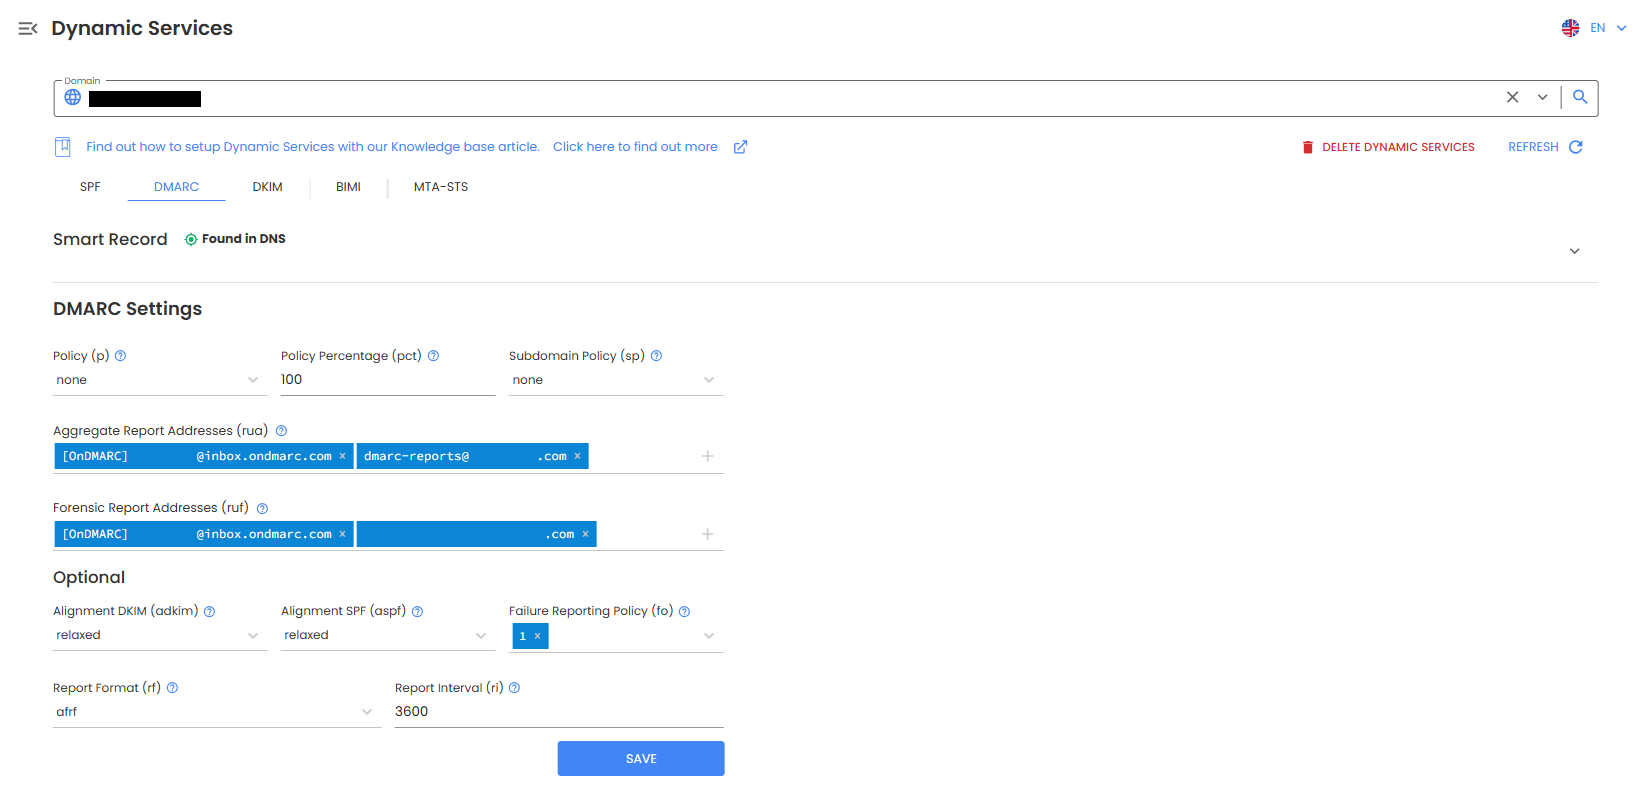
Define your Core Policy Settings by populating the following fields:
-
Policy (p): Select your enforcement level (None, Quarantine, or Reject).
-
Percentage (pct): Set the percentage of mail to which the policy applies (default is 100).
-
Subdomain Policy (sp): Define a specific policy for subdomains or leave it to inherit the main policy.
-
-
Configure your Reporting Destinations (Email Addresses):
-
Aggregate Reports (rua): Ensure the OnDMARC reporting address is listed to receive XML data.
-
Forensic Reports (ruf): Add your designated address for real-time failure alerts.
-
-
(Optional) Set Advanced Tags such as Alignment (adkim/aspf) or Reporting Intervals (ri).
-
Click SAVE: This saves the configuration to the platform so it is ready to be served once the delegation is live.
Further Details: DMARC Policy Configuration Options
When configuring your DMARC record via Red Sift OnDMARC, the following tags define how receiving mail servers should treat your mail and where they should send security telemetry.
Core Policy Tags
-
Policy (p): The primary instruction for the receiver. This determines what happens to an email that fails DMARC checks (e.g.,
none,quarantine, orreject). -
Policy Percentage (pct): A value (0–100) that tells the receiver what percentage of failing emails should be subjected to the policy. This allows for a staged "rollout" of a stricter policy.
-
Subdomain Policy (sp): Specifies the policy for subdomains. Subdomains typically inherit the main domain's policy unless you explicitly set a different DMARC policy for the subdomain.
Note: When moving to
p=reject, ensure your internal services and security gateways honor DMARC policies for inbound mail to avoid delivery issues.
Reporting Tags
-
Aggregate Report Addresses (rua): The destination for XML aggregate reports. These provide high-level data on authentication passes/fails.
-
Forensic Report Addresses (ruf): The destination for redacted, individual failure reports (forensic data). These are useful for deep-dive troubleshooting.
Optional Advanced Tags
-
Alignment DKIM (adkim): Sets the requirement for DKIM alignment.
relaxedallows for subdomain matches, whilestrictrequires an exact domain match. -
Alignment SPF (aspf): Sets the requirement for SPF alignment. Similar to DKIM, this can be
relaxedorstrict. -
Failure Reporting Policy (fo): Determines the conditions under which a forensic report is generated (e.g.,
1generates a report if any underlying (SPF/DKIM) authentication mechanism fails). -
Report Format (rf): Defines the format for forensic reports (standardized as
afrf). -
Report Interval (ri): The requested frequency (in seconds) for receiving aggregate reports.
Step 2: Delegate DMARC (DNS Delegation)
Once your policy settings are saved in Dynamic Services, you can safely delegate the _dmarc subdomain. This allows the OnDMARC "Smart Record" to respond to receiver queries on your behalf.
-
In OnDMARC, ensure you are still in the DMARC > Dynamic Services > DMARC tab.
-
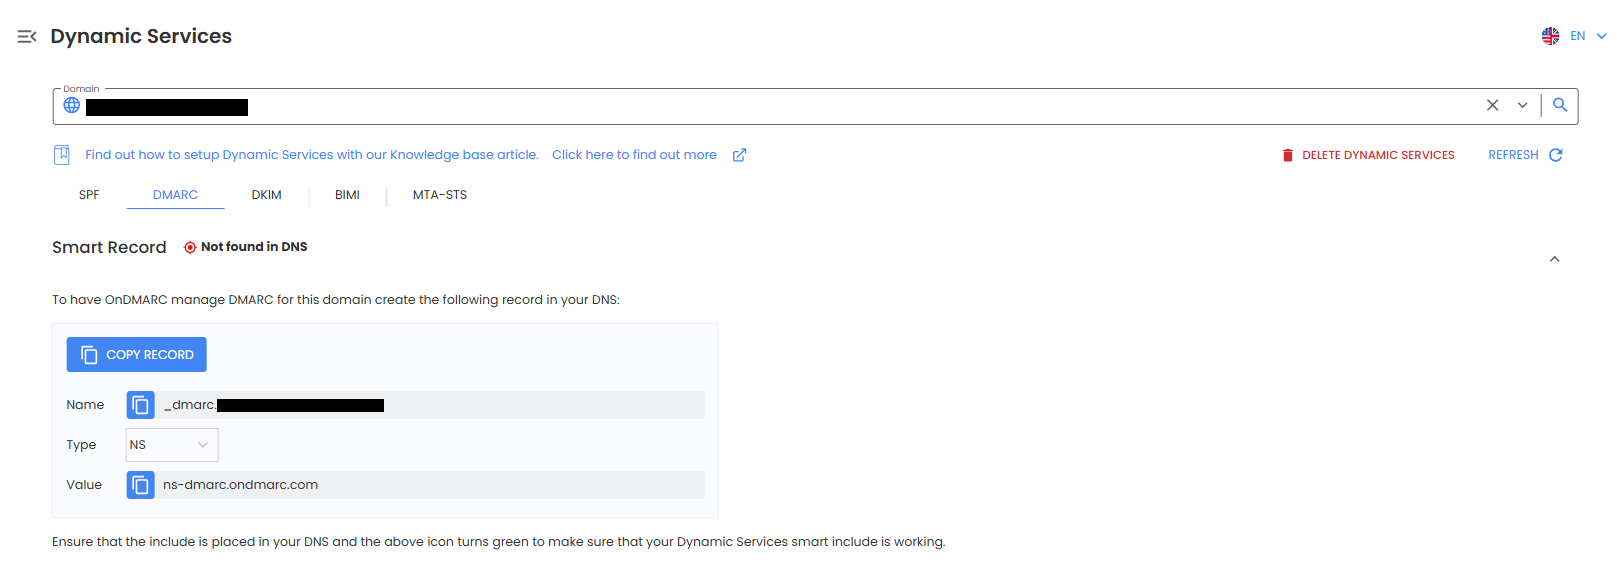
Prepare to copy the record name and value (typically an NS or CNAME record) generated by the platform:
-
Go to your DNS Provider (e.g., Cloudflare, GoDaddy):
-
Type: NS (or CNAME as specified by the panel)
-
Name:
_dmarcor (full version_dmarc.mydomain.com) -
Value: Paste the smart server address provided by OnDMARC (e.g.,
ns-dmarc.ondmarc.com).
-
-
Save the record.
Important Deployment Notes
-
Subdomain Delegation: By publishing this record, you are specifically delegating the
_dmarcsubdomain portion of your DNS to OnDMARC. You are not delegating your entire root domain to the panel. -
Instant Updates: Because you configured your policy in Step 1, the "Smart Record" is already armed. Any future changes to your policy (e.g., moving from Monitoring to Reject) can be done inside OnDMARC and will propagate to the public internet in 5–10 minutes.
-
Internal Alignment: When moving to a "Reject" policy, ensure your internal mail servers or security gateways are configured to honor DMARC for inbound mail to avoid internal delivery issues.
-
Automated Monitoring: OnDMARC automatically ingests and translates the "noisy" XML reports into a graphical interface, allowing for continuous oversight without manual data parsing.
Need support for your OnDMARC service, please contact our friendly Support Team at 877.983.6624 (United States) or +1.760.444.8674 (International).