
This guide explains how to add and migrate your existing DKIM selectors to OnDMARC’s Dynamic DKIM before delegating the protocol. Following this process ensures that your signed emails continue to pass authentication without interruption during the transition.
Overview of Dynamic DKIM
Dynamic DKIM allows you to manage all of your domain’s DKIM keys and selectors from a single interface. By delegating the _domainkey.mydomain.com subdomain to OnDMARC, you can add, rotate, or remove keys instantly without having to modify your DNS zone file for every change.
Step 1: Migrate Existing Selectors to OnDMARC
Before delegating the protocol in your DNS, it is recommended to manually "prime" the Dynamic DKIM panel with your current active keys.
-
If it is not already enabled, log in to your OnDMARC dashboard and go to the DMARC > Dynamic Services > Select CONFIGURE DYNAMIC SERVICES to toggle the feature and enable it in the backend.
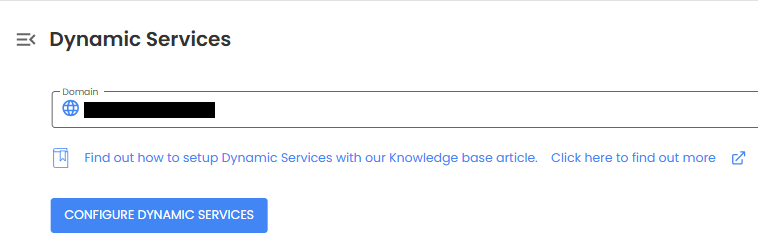
-
Select the DKIM tab.
-
Find the selectors in your DNS zone (for example, in
google._domainkey, the selector is google). -
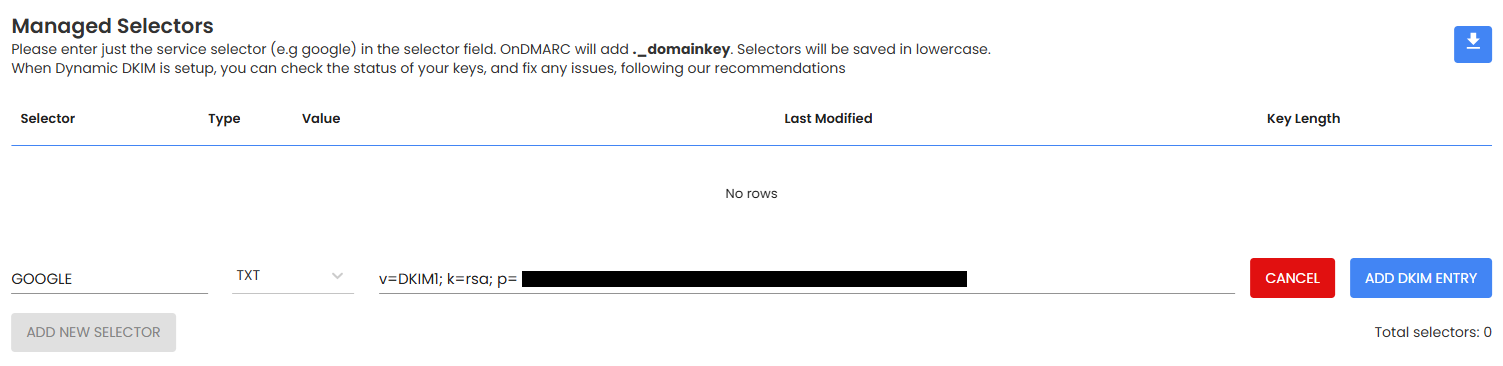
In the Dynamic DKIM panel, enter the following details for each existing key by clicking on the ADD NEW SELECTOR button and populating the following columns:
For Example:
-
Selector: Enter the selector name before the ._domainkey record (e.g.,
GOOGLE). -
Type: Select TXT or CNAME depending on the record type
-
Value: Paste your existing public key string.
Sample TXT Value:
v=DKIM1; k=rsa; p=<EXAMPLE PUBLIC KEY STRING HERE>...
-
Click ADD DKIM ENTRY.
-
Verify: Ensure the key appears in the Managed Selectors section of the Dynamic Services tab and is marked as a valid DKIM key.
Step 2: Delegate DKIM (DomainKeys Identified Mail)
Once all of the necessary selectors have been added to Dynamic Services, you can safely delegate the _domainkey subdomain to OnDMARC. This is a proactive step for active sending domains, though typically optional for inactive or "parked" domains.
-
In OnDMARC, navigate to DMARC > Dynamic Services > DKIM tab.
-
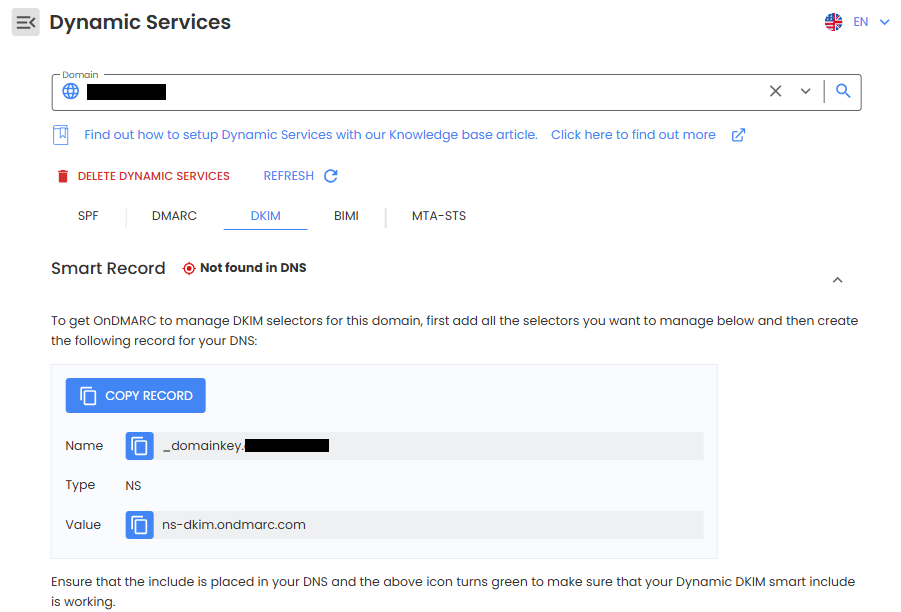
Prepare to copy the NS record generated name and value (e.g.,
_domainkey.mydomain.comandns-dkim.ondmarc.com) as shown in the screenshot below:
-
Go to your DNS Provider (e.g., Cloudflare, GoDaddy):
-
Type: NS
-
Name:
_domainkeyor (full version_domainkey.mydomain.com) -
Value: Paste the smart server address provided by OnDMARC (e.g.,
ns-dkim.ondmarc.com).
-
-
Save the record.
-
Remove any existing (
_domainkey.)DKIM records from your DNS zone.
If 101domain is your DNS provider and you would prefer that our Customer Success Engineers handle the setup for you, please open a support ticket in your 101domain account.
Important Deployment Notes
-
Subdomain Delegation: By publishing this record, you are specifically delegating the
_domainkeysubdomain portion of your DNS to OnDMARC’s smart servers. You are not delegating your entire root domain. -
Zero Downtime: Because you added the keys in Step 1 before changing the DNS records, receiving servers will still find your keys at the new delegated location immediately, preventing authentication failures.
-
Ongoing Management: From this point forward, any new DKIM keys should be added directly into the OnDMARC Dynamic DKIM panel rather than your DNS provider.
DKIM records added to your DNS zone after Dynamic DKIM Services are set up will NOT work. Please make sure you add them in the Dynamic Services configuration in your OnDMARC account.
Need support for your OnDMARC service, please contact our friendly Support Team at 877.983.6624 (United States) or +1.760.444.8674 (International).